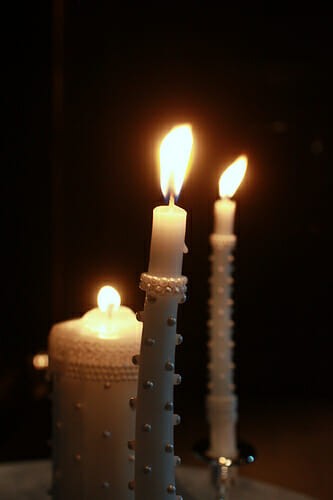
Easy to Make Pearl Studded Unity Candle
After the wedding, most unity candles are placed on a shelf and never lit again, or carefully wrapped in tissue, tucked away and forgotten. Unity candles are expensive but luckily, they are also easy to make. The trick to making a great unity candle for just a fraction of the retail cost is to keep it simple. A candle with too much on it will end up looking like a third grade craft project.
Pearl studded candles add a touch of elegance to any event and require very little artistic talent to make. All you need to create a unity candle is a pillar candle at least ten inches tall, a pair of good wire cutters and a box of corsage or boutonniere pins. Pearl headed pins are available in various colors and sizes and usually sold by the box. An average box will hold 144 pins.
You can create any pattern but for those who are not crafty, it is best to stick with a simple design such as a diamond pattern. The diamond pattern is easy to make and has an elegant and timeless look.
Pillar candles come in so many different sizes it is hard to say exactly how many pins you will need. The best way to determine the number of pins needed is to measure the circumference, which is the distance around the candle and the height. A pillar candle that is three inches in diameter will have a circumference of ten and a half inches. Placing the pins ¾ of an inch apart, the first row will take fourteen pins and to create a diamond pattern the second row will take 13 pins. You will need approximately 122 pins to cover a candle 10 inches tall and 3 inches wide leaving one inch from the top and bottom and between rows.
To keep rows straight use a template. A template can be made by taking a piece of tape ten and a half inches long; using a felt pen put a dot every ¾ inch along the edge of the tape.
Wrap the template around the candle just below where you want your first row to begin and insert the pins just above the dots on the edge of the template. Once the first row has been completed, remove the template and repeat the process with the second row placing the template so the dots are between the pins of the first row. Continue alternating pin placement with each row to create a diamond pattern.
Cut the pins up to ¼ an inch long. If soak the cut tins in hot water for a minute they will go into the wax with little effort. Do not try to insert a pin that is two-inches long into a candle, it will damage the candle and bend the pin.
Tapers, the candles used to light the unity candle can usually handle four small pins in the first row and three in the second row. Repeating the three four placement in the following rows will create a diamond pattern. A taper that is ¾ of an inch in diameter will measure 2 ¾ around. A standard 15 inch taper leaving 1 inch at the top and bottom will need 92 pins following the four – three pattern with one inch between rows. The number of pins used is up to you but if the spacing is too close will damage the integrity of the candle causing the wax to shatter or crack.
Unique unity candle designs are limited only by your imagination. Look around you and you will see a never-ending resource of supplies. Fingernail art including nail jewels, jewelry, and beading, upholstery nail head trim and even transparent decals that cling from an office supply store can be used to make a beautiful candle.
Mary Spies has written numerous articles on wedding planning, drawing on her 30 years as a wedding professional. writes a weekly blog, What Every Bride Should Know When Planning a Wedding and is producing a series of wedding planning DVD’s. Mary has recently completed her first book on wedding planning.

